Capturing the Milky Way for Beginners
Astrophotography might sound complex, but it's pretty straightforward. You don't need the most expensive camera to capture the Milky Way...just a camera with manual controls, a tripod, and a fast wide-angle lens (f/2.8 or better). Start with basic settings: 3200 ISO, f/2.8, and 30 seconds, then adjust based on your results. The real secret isn't perfect gear but proper planning using tools like Milky Way Planner to know exactly when and where the galactic core will be visible from your location.
Astrophotography might sound complex, but it is pretty straightforward (albeit technical). Astrophotography is all about capturing the night sky and all its wonders. One of the most stunning features you can shoot is the Milky Way Core, and here’s how you can get started.
Start with the Right Gear
You don't need the most expensive camera to capture the Milky Way. All you need is a camera that allows manual controls, a tripod, a ballhead or mount for your camera, and a 'fast' wide-angle lens. Note: "fast" is defined as f/2.8 or better (e.g., f/2.0, f/1.4, etc).
Understanding Your Camera
Switch your camera to manual mode. This lets you control the aperture, ISO, and shutter speed – vital elements for night photography. Use a wide aperture (like f/2.8), a high ISO (around 3200), and a long-ish) shutter speed (20-30 seconds) to start. Adjust based on the brightness of your sky. For a deeper dive into these settings, see our lesson on camera settings for Milky Way photography.
While I can't give you the 'right' settings because those will depend entirely on your camera and lens, but starting with the following settings should get you started:
- 3200 ISO
- f/2.8
- 30 seconds
When you get into the field, set your camera to those settings, take a photo, and look at the sky. You will most likely see the stars "trailing" (e.g., moving) and will need to adjust your shutter speed, but these settings will get you started.
Depending on your camera and sensor, your shutter speed might be 10 or 30 seconds. The best approach to calculate this is to use PhotoPills' "spot stars" option and enter your camera, lens, and aperture to give you the appropriate shutter speed for your setup. PhotoPills provides a calculation based on the NPF Rule, which will give you a good place to start for getting stars that are sharp and not moving.
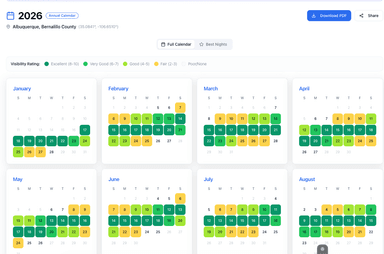
Using the Milky Way Planner
Once you've set your location, choose the month and year you plan to shoot. If this is your first time, our guide to planning your first shoot walks through the full process. The planner calculates and shows the best dates and times and visibility to capture the Milky Way core. You can also view your entire year at a glance with the annual calendar.
In addition to the best dates and times, the planner shows the entire month that you've selected and displays times and visibility ratings for the Milky Way
In The Field
You've got your gear and your plan...now what?
Go find something to photograph!
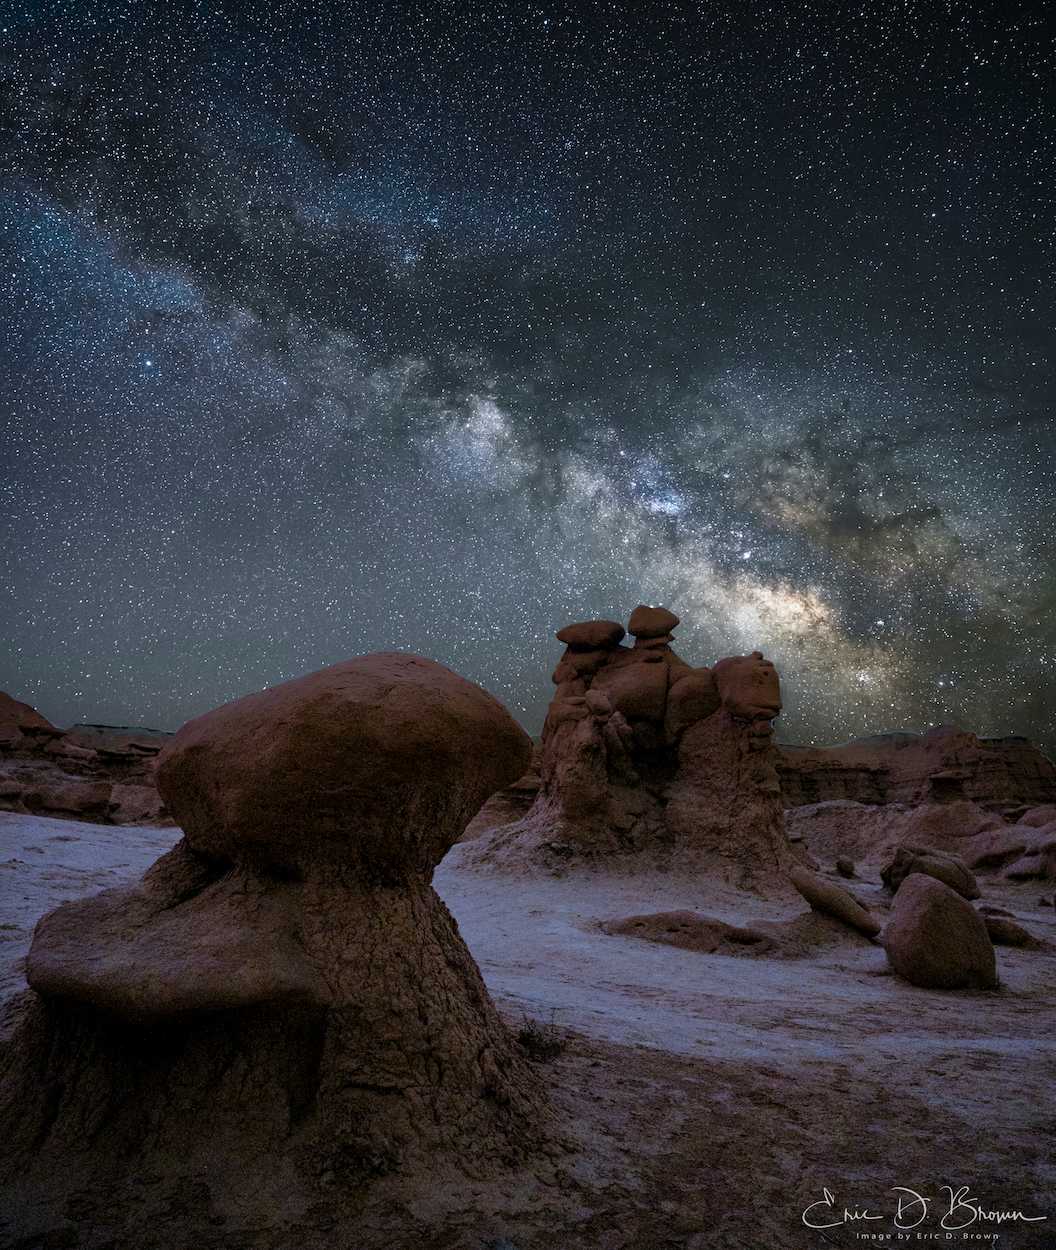
For your first few attempts, I recommend finding a foreground with rocks and/or mountains to make blending your foreground and sky images easier. For example, the image below was taken at Goblin Valley State Park In Hanksville, Utah. The blending of the foreground and sky was fairly straightforward because there weren't any trees or plants on the horizon that would cause trouble blending in Photoshop.
The Golden Hour? Not Quite
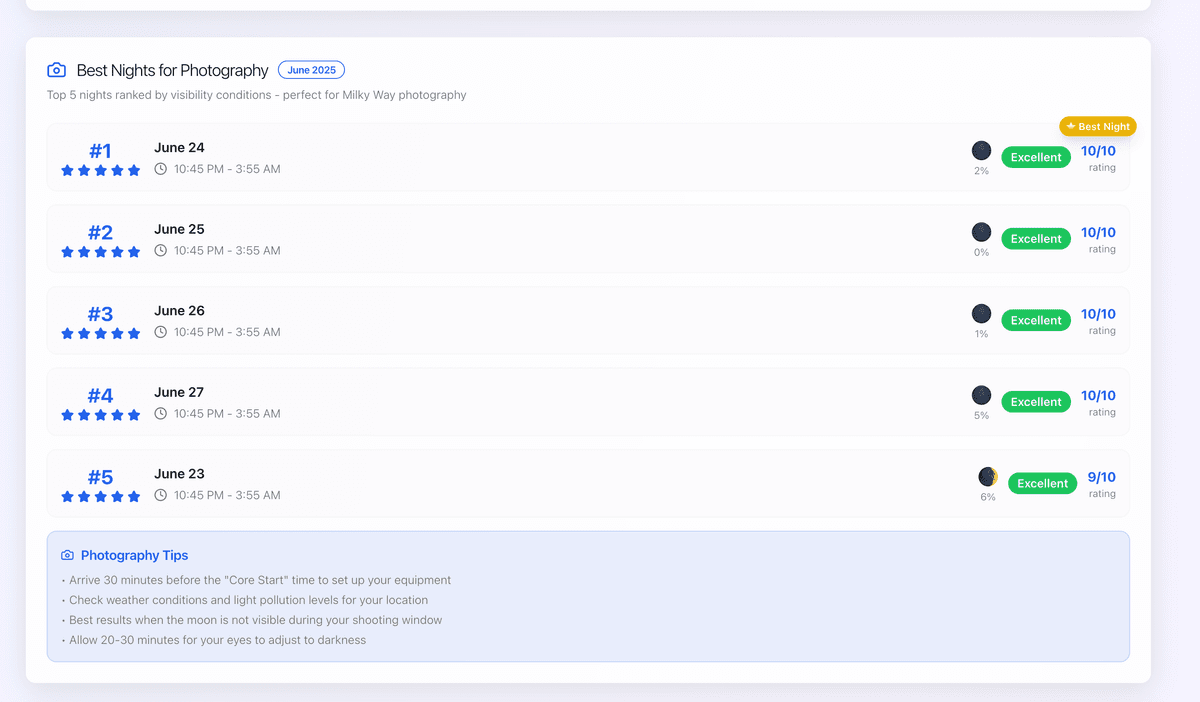
For Milky Way photography, forget the golden hour. We aim for pitch-black conditions when the Milky Way's core is most visible. Our Milky Way Planning tool helps here. Enter your location and desired month/year into the Milky Way Planner, and it will show you the dates and times when the Milky Way will be in prime position, away from moonlight and city lights.
What about the Blue Hour?
Blue Hour refers to the twilight period in the morning and evening, just before sunrise and just after sunset, when the sun is below the horizon, and the indirect sunlight takes on a predominantly blue shade. You can use the Blue Hour to capture and blend your foreground in post-processing.
OR, you can do a long exposure (~ 1 to 5 minutes, depending on ambient lighting) to capture your foreground. I am a fan of the Blue Hour for capturing the foreground, but there are a few times throughout the year when it makes sense to use it. I find that 90% of my foregrounds are captured with long exposures.
I'll talk a bit more about 'blending' foregrounds and skies in future blog posts.
Taking the photograph(s)
Okay, you are in the field, have found your foreground and composition, and are ready to take a photograph. What next?
Here's what I do:
- Set things up - tripod, camera, etc. Once the tripod/camera is set - DO NOT MOVE IT. Keep everything as it is until you've captured your foreground images. Your camera *might* be moved after the foreground when taking your sky photos.
- Focus on the foreground and/or do focus stacking for the foreground if your subject is really close to your camera.
- Capture the foreground. I usually go with 1600 ISO for 2 minutes to see what my foreground will look like. I usually take a few shots with higher / lower ISO and exposure times just to get a few options back in post-processing.
- Focus on the Sky. I always spend more time than I think I might really need to focus on my image. Focusing at night is hard, but the effort is worth it. NOTE: You will need to use manual focus here.
- Capture my sky. Often, I'll move my camera 'up' a bit to ensure I'm capturing more of the sky in the sky frames -- the foreground piece of the sky frame will be discarded so it doesn't make sense to waste so much of the frame with something that will be thrown away. I set my exposure time for the sky to the time provided by the PhotoPills Spot Stars app. I take 10 to 15 images of the sky to use to stack later. Stacking helps reduce noise post-processing.
- Once the sky is captured, I then take my 'dark' images. I put my lens cap on, and then I take the same number of dark images as I took of the sky (e.g., 10 to 15). These are used to help reduce noise and hot pixels in post-processing.
- Once the sky and dark images are captured, I feel good about moving my tripod.
- After capturing the foreground and sky, I moved on to the other compositions I wanted to shoot (if I had any others for that location).
Final Field Tips
Scout your location(s) during the day. This will allow you to stay safe and find some great compositions. If you plan to shoot alone, review our guide to solo astrophotography safety.
Dress warmly, bring spare batteries and memory cards, and use a remote shutter or your camera’s timer to avoid shaking. Most importantly, enjoy the experience of being under the stars.
Practice Makes Perfect
Don’t expect perfection on your first try. You won't know if you got anything good when you are in the field. The back of your camera will generally look great...and then when you get home and load the images into your post-processing software, you realize you forgot to focus things (or some other silly thing). There's nothing worse than spending time and money on capturing an image to find that it's out of focus. Here's an example of that from Utah recently:
Night photography has its challenges, but it’s rewarding. Experiment with different settings, and use our planning tools to plan multiple outings. The more you shoot, the better you understand what works for your style and environment.